
Artwork is something that I don’t think you need to stop acquiring. This is something I learned from my parents growing up, as they would buy one new piece of art for every anniversary. If a room needed refreshing, they would take one piece down and grab another out of storage. Though I love my herringbone brick artwork, I stumbled upon a piece of art that I REALLY wanted for my living room.

This giant, gold circle art piece from High Fashion Home grabbed my attention the moment I saw it. I was completely in love, but I held back from buying it since a $959 price tag wasn’t really in my budget. What I loved about it was it’s size, texture, and simplicity. Attention grabbing, yet subtle and unobtrusive.

I went to Michael’s for some other item, as I usually do, and that day ended up being one of their big canvas sales. I scored a 30″ x 40″ canvas for only $13 and bought a big bottle of acrylic paint to work on recreating my treasured art piece! Looking back, an oil paint would have held its shape more and given the painting even more texture, but using acrylic paint was very cheap and also allowed me to get the same color gold on the frame as on the painting.
To make the painting, I covered the entire thing in white paint. Then, I located the center of the canvas and started painting various shaped dots in a circular pattern, making sure to use plenty of paint to add dimension. To finish off the artwork, I made one of my easy $10 picture frames, bringing the total cost of this project to about $30. At approximately 1/30th of the cost, I think it’s a winner!

See below for the full DIY for this gold circle artwork.
Gold Circle Artwork DIY
Supplies:
Large canvas (mine is 30″ x 40″)
Gold paint
White Paint
Paint Brush
Measuring Tape
Time:
1-2 hours painting, 28 hours drying
Difficulty:
Easy
1. Start by painting your entire canvas white. Seeing as the canvas was already a white hue to begin with, this step may be unnecessary to some, so I suppose we can leave this step as optional. Let your paint dry for at least 4 hours.
2. Use a measuring tape to locate the center of your canvas. Start painting your gold dots here and then circling around, adding more and more dots until you reach your desired circle size. Make sure to use a generous amount of paint on the dots to give them more dimension and shape.
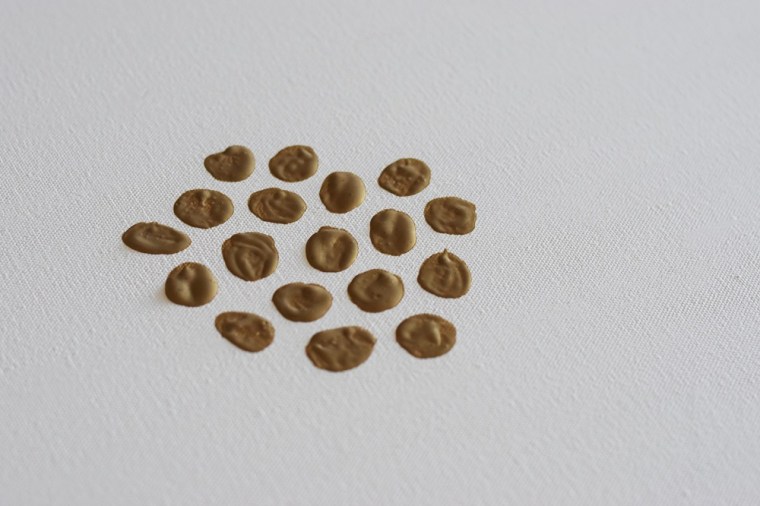
3. Allow your canvas to dry horizontally so that none of the paint drips! After about 24 hours, your painting should be completely dry. At this point you can hang up your finished work of art, or make a DIY picture frame to really help the gold pop. I painted mine with the same paint that I used to paint the dots.

I absolutely love it! Love your blog too! And by the way. Personally. I think yours looks better then the original.
LikeLiked by 1 person
Aw you are so sweet!! Thank you so much! ❤
LikeLiked by 1 person
I’ll have to try this one. Maybe in Rose Gold (:
LikeLiked by 1 person
That would be beautiful! Let me know how it goes if you try it!
LikeLiked by 1 person
I will! (:
LikeLiked by 1 person
I am so happy I came upon your blog 😀🙂 😘
LikeLike
Love this!
LikeLiked by 1 person
Thank you! So glad you liked the project, let me know if you try it out!
LikeLike
Absolutely LOVE this!!!
LikeLiked by 1 person
Thanks Shauna!!
LikeLiked by 1 person
Love this!
LikeLiked by 1 person
I’m glad! Thanks so much!
LikeLike
I want it. I can haz it? Make it with me. KLOVEYOUBAI
LikeLiked by 1 person
I’m glad you like it!!
LikeLike