
When Megan decided she wanted to have an 80’s themed birthday party with black lights and neon everything I was obviously on board. Horror struck, however, when I searched for 80’s themed and neon decorated cakes.
Almost every cake was:
- decorated with black fondant (which Megan hates)
- looked really childish (like that melted crayon craft running down the side of a white cake) or
- was 100% over my skill level (sorry, not hand molding a rubiks cube and a tape cassette for a cake that will be devoured in the dark)


Megan suggested I could just make a plain white cake with colored cakes in the middle for a surprise effect, but I felt like I couldn’t settle after the blue ombre ruffle and the gold and rosette masterpieces (I flatter myself) from years before.
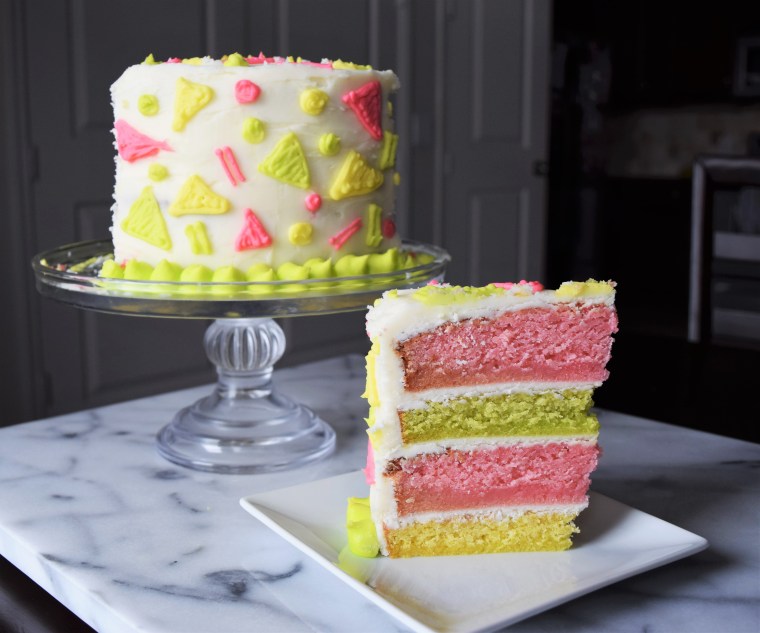
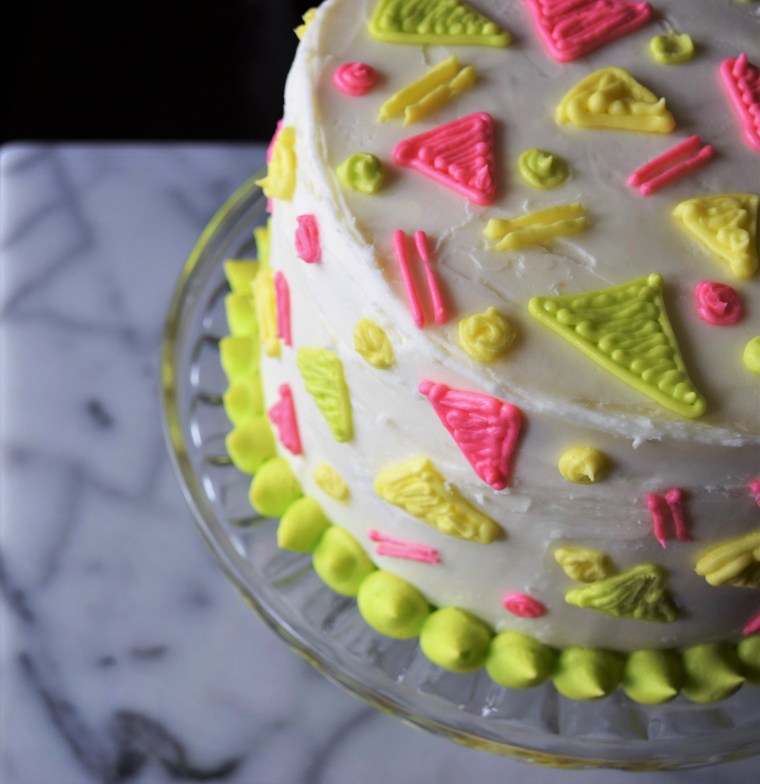
Sticking with the colored cakes, because that was a solid idea, I built up four layers of the birthday girl’s favorite white cake and buttercream frosting. For decorations, I took a page straight out of an 80’s coloring book. Remember those abstract triangle, circle, and rectangle adorned pages? SO 80’S! My parents even had plates with those designs. The shapes could be made pretty simply with food colored buttercream and a small round decorating tip. Abstract pattern = hard to mess up. I used pink, green, and yellow for a bright effect. I also used a larger round tip to create little green balls around the base of the cake to make it feel more balanced. To top the cake, a VH1 quintessential “I HEART THE 80’S” sign was made out of card stock and lollipop sticks.
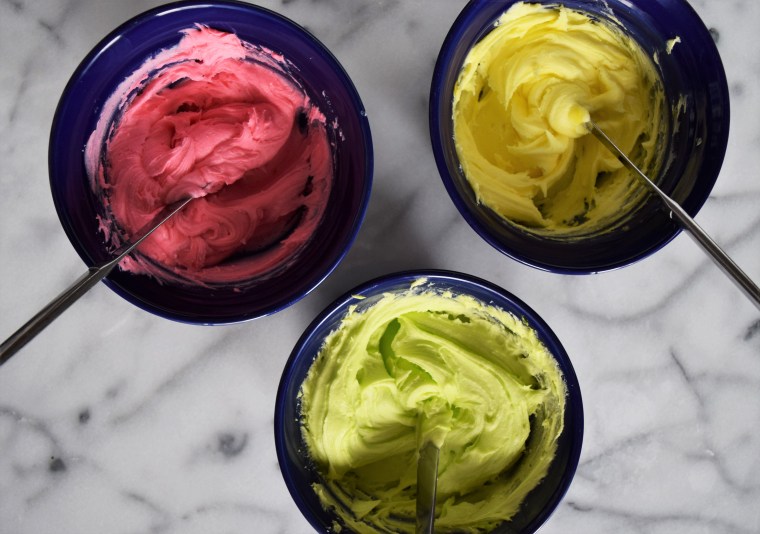
Visual learners, see the photos below! The recipe for this sweet, white cake is listed below as well. It is SWEET, but almond infused and oh so yummy. The homemade buttercream is my family’s recipe. I used this neon food coloring to obtain more vivid colors in the green and pink, while the yellow came from a normal food coloring pack.


Scroll below for the recipe and decorating instructions.
80's Neon Cake
Ingredients:
Cake:
2 1/4 cups Flour
2 cups Milk
12 Egg Whites
4 tsp. Almond Extract
2 tsp. Vanilla Extract
3 1/2 cups Sugar
8 tsp. Baking Powder
2 tsp. Salt
1.5 cups Butter (3 sticks)
Neon Pink, Yellow, and Neon Green Food Coloring
Crumb Coat Buttercream Frosting:
1 cup Room Temperature Butter (2 sticks)
6-8 Tbs. Milk
7 cups Powdered Sugar
2 tsp. Vanilla
Dash of salt
Decorating Frosting:
1/2 cup Room Temperature Butter (1 stick)
3-4 Tbs. Milk
3 1/2 cups Powdered Sugar
Pink, Yellow, and Green Food Coloring
NOTE: This recipe makes a 4 layer cake, so you may want to half the recipe and do two rounds of baking since you will have a FULL mixing bowl with the full recipe, plus most people I know are reasonable and only have two round cake pans to use at one time.
1. Preheat your oven to 350 deg. F. Grease four round cake pans and lightly flour them so that the cakes do not stick. Mix together in a large bowl the milk, egg whites, and extracts until combined.
2. In a mixer at low speed, mix the flour, sugar, baking powder, and salt until combined. Add the butter in small cubes and mix until all of the ingredients stick together.
3. Add most of the liquid ingredients to the dry ingredients and mix at medium speed for about 2 minutes. Add the rest of the liquid and beat again for about a minute.
4. If you are making half of the batter now and half later, separate the batter into two bowls, each with half of the batter. Add green and yellow food coloring to each and mix until you achieve the desired color (I used quite a few drops since the cake will bake slightly lighter than expected). Pour the batter into the two prepared pans and bake for about 25-30 minutes, or until a toothpick inserted into the cake comes out clean. Take the cakes out and cool for at least 20 minutes on a wire rack. Flip the cakes out and cool completely.
Repeat steps 1-4 to bake the rest of the cakes and dye all of the batter pink so you have two pink layers.
NOTE: Here I wrapped the cakes individually with plastic wrap and placed them in the freezer once they had cooled. Then when I was ready to assemble the cake, I removed them, unwrapped them, and cut the tops off so they were flat. This is not necessary but it allows you to make the cake ahead of time and also make sure the cake is totally level.
5. To make the crumb coat frosting, beat the butter until it is smooth. Slowly add the powdered sugar and milk, alternating between each, until the frosting is stiff and holds to the whisk. Add the vanilla and a dash of salt and mix to combine.
6. To assemble the cake, place one layer on to a cake stand. Apply a little less than 1/5 of the frosting in an even layer across the top of the cake all the way to the edges. Repeat with the other layers. Use the remaining frosting to cover the outside of the cake. Place the cake in the refrigerator and work on your second batch of frosting.
7. To make the rest of the frosting, beat the butter until it is smooth. Slowly add the powdered sugar and milk, alternating between each, until the frosting is stiff.
Separate the frosting into four bowls. Half of the frosting will stay white to cover any areas that need more coverage, and the other half will be split into pink, yellow, and green, green having a little more than the others to use for the base of the cake. Cover the cake with white frosting so that the cakes do not show through. I recommend using a frosting spreader for this task to make the frosting look smooth. Then place the colored frosting one at a time into a decorating bag with a small, round tip and draw triangles, skinny rectangles, and small circles all over the cake. Repeat with the other frosting colors, only using a small amount of the green. Use the remaining green frosting to create balls at the base of the cake with a larger round tip.
NOTE: A plastic bag with the tip cut off can be used in a pinch, though the lines and the shapes will not be as evenly filled as they would would a small, round tip.
Finish the cake with a cute, 80’s cake topper!
Recipe by Bunny Baubles Blog

Looks great!
LikeLiked by 1 person
Thank you!
LikeLike