
You know those seams in your shirt that tend to be right below your arm pits or straight down the back that make the shirt look tailored? Those are darts. I know, you were hoping this was a DIY for your man cave, but I haven’t taken up metal working yet…yet…
For this installment of “It’s Sew Easy”, I am going to teach you how to add darts to your shirts or dresses. Though they are only a simple straight stitch, there are some tips I’ve learned from reading and through practice that you need to know. My major issues with darts when I starting sewing included bunching, uneven lengths (they always ended up different sizes), and misplacement resulting it some strange bust lines.
Fear not! Let’s get going. Scroll below to see the full tutorial.
How to Make a Dart
Supplies:
Front Bodice Piece of Shirt
Thread to match the shirt
Sewing Machine
Pins
Scissors
Measuring Tape
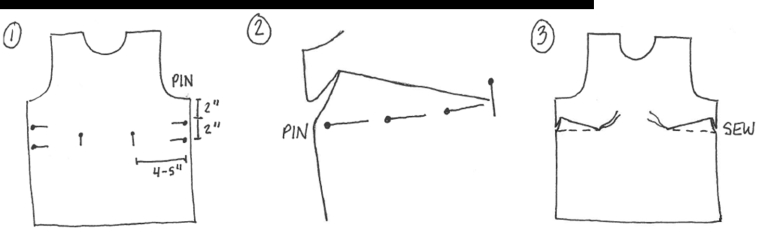
1. Mark your dart: Take the front bodice piece of your shirt sewing project and turn it wrong side out. Measure down from the arm pit 2″ on each side of the shirt and mark with a pin. Then, measure down from these pins about 2″ and mark with a pin again. Measure horizontally inward across the shirt 4-5″ from the edges of the shirt and mark with a pin.
2. Create the dart shape: Put your thumb and your index finger on the two pins on the same side of the shirt and pinch the fabric to bring them together. Pin the fabric together here. Then, gradually tapering to a triangle shape, pin more pins in a line to meet the pin you placed 4-5″ inward. This makes one dart. Repeat on the other side.
3. Sew the dart: Place your two layers of fabric into the sewing machine at the outside edge of the shirt on the pins. Sew a straight stitch along the pin line forward and backward to create a knot. Then continue forward, removing pins as you go, until you reach the end of the triangle. Continue sewing until you have sewn off the fabric. DO NOT back-stitch. Cut the threads with a few inches of extra thread hanging off. Repeat on the other dart.
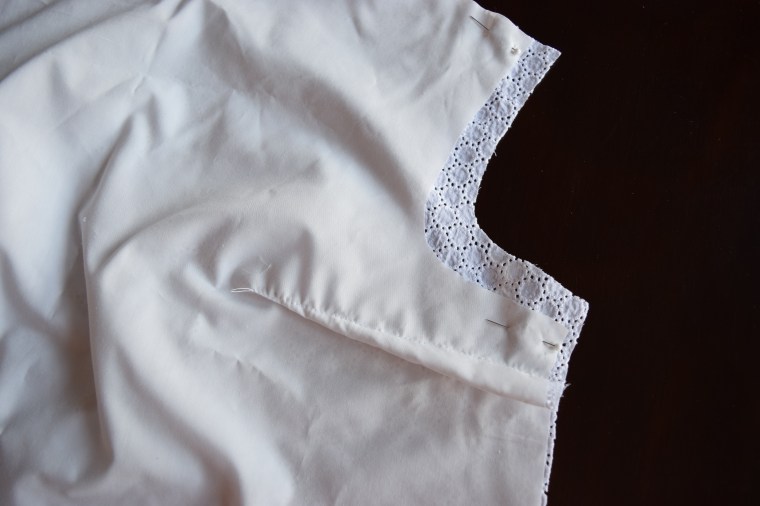
4. Completing the dart: To complete the darts, take the loose threads at the ends of your darts and tie them into a couple of knots. This keeps the darts from coming undone, but avoids getting bunching at the tip of your dart that you get by using a back-stitch this close to the edge of the fabric.
Use this new skill to conquer this Eyelet Peplum tutorial. Check back weekly to learn a new skill to help you out with my, or anyone else’s, sewing tutorials!

4 thoughts on “It’s Sew Easy: How to Make a Dart Sewing Tutorial”