
Spring is here and that means my jeans are going into hibernation. Weather that allows me to not wear pants is the best. Though I have quite a few dresses, I have a couple that I tend to gravitate toward every time I reach into my closet. My faves tend to be:
1. Colorful! If I only get one piece of clothing, I’m not about to make it boring.
2. Comfortable. None of this tight everywhere or super short business. I just don’t end up wearing those ones very much.
3. Flattering. If you feel good in it, you’ll always want to wear it!


Clothing Details: Dress – made by me || Sandals – Steve Madden (similar) || Purse – Rebecca Minkoff || Watch – Kate Spade New York
If you’re looking for your newest go to dress, you’ve come to the right place. My high neck fit and flare dress pattern is based off of a dress I purchased last summer (similar) and brought on all of my trips because of it’s versatility. The tighter bodice and flared skirt make this dress super flattering on all body types, nipping you in at the waist. The high neck and above the knee length balance out the tightness and allow you to wear it to work during the day with a light jacket, and then out to a dinner date at night!
With buds in bloom all around me, I was inspired to pick this beautiful fabric from JoAnn Fabrics, covered in purple flowers. Did I mention it’s also incredibly soft? Comfort – check!


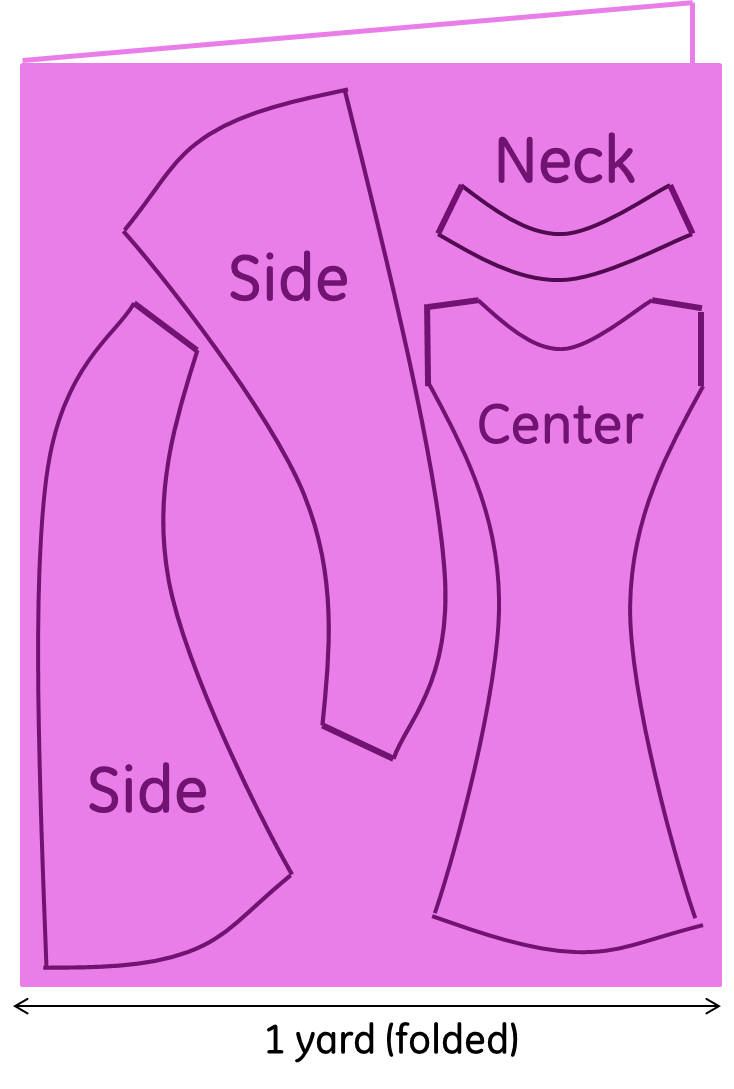
The pattern is shown below and only requires you to use three different pattern pieces. I also threw some lace on there, because who doesn’t want a little fun to carry around on their shoulders? I promise you’ll be wanting to bring it on every adventure you take this coming year! You may just need to make a couple versions for good measure…
DIY Fit and Flare Sun Dress Tutorial
Supplies:
2 yards Stretch Cotton Fabric
Thread to Match
Paper (used to make the 3 pattern pieces)
Pencil
Tape
Scissors
Pins
Sewing Machine
1 yard Lace Trim (optional)

1. Use some paper, a pencil, and some tape to make the three pattern pieces shown below. Make sure you also make 2 “Side” pattern pieces. Fold your 2 yards of fabric in half and pin your “Center”, 2 “Side”, and “Neck” patterns on to it as shown. Use your scissors to cut along the pattern edges, and then unpin the patterns from the fabric.
Amendment: After it was brought to my attention by a helpful reader, the cutting and pinning could be a bit confusing. The fabric that I purchased stretched in both directions, so pinning the pattern pieces the way I have shown allows for the body to stretch horizontally and vertically. Most fabrics stretch only from selvage edge to selvage edge, and this will not work because you will not have any stretch along the width of your body. If your fabric stretches only in one direction, turn the pattern in the other direction so that the width of the dress will stretch. This may actually allow you to buy less fabric if you would like the dress to be shorter (you only need to buy fabric in twice the length of the dress).

2. You now should have eight pieces of fabric cut out for your dress. To patch the dress together, start with one “Center” and two opposite “Side” pieces (two that were cut together because of the folded fabric will be opposite) and pin the long edges to one another with the nice side of the fabric touching. Repeat with the other “Center” and two “Side” pieces. Grab your sewing machine and matching thread and sew a straight stitch along these lines (4 long seams total) at about a 1/4″ from the edge of the fabric. You now have a front and a back to the dress!
3. Take the front and back of the dress and pin them to each other with the nice side of the fabric facing inwards. Sew the front and back to one another at about a 1/4″ from the edge of the fabric (2 long seams).
4. Turn your dress right side out. Pin the “Neck” pieces with the nice sides of the fabric touching one another along the front and back of the neck of the dress. Sew the “Neck” pieces at about a 1/4″ from the edge of the fabric, overlapping the two “Neck” pieces when you sew so that they get stitched together. Flip the neck pieces inward.
5. Carefully fold the edges of the fabric under about 1/4″ all the way around the arm holes and at the bottom hem of the dress, and sew along these edges to finish off the dress.
6. To add lace to the sleeves, cut the 1 yard of lace trim in half. Pin the lace to the underside of the fabric on each arm hole, starting and finishing at the arm pit, so that just a little lace sticks out beyond your fabric. Sew along the edge of the lace to attach it to the dress using the same thread as before. Trim the excess lace off.


I don’t know if I’m missing something but what fabric is this? I am trying to find a cute color or design but I can’t find any floral designs or anything like that. Any guidance?
LikeLike
Hi Emma, this was just a four way stretch jersey knit that I got from Joann Crafts about 4 years ago. I do not see that they still have it unfortunately, but maybe they have something similar that you could try?
LikeLike
I’m sure I am just missing something here, but where do you download the pattern? I love this style of dress, and yours is so cute!
LikeLiked by 1 person
Hi Teresa! I’m so sorry but I don’t actually create downloadable patterns! I have given the instructions for how to measure out and create your own pattern based on your measurements since this is how I make my own patterns.
LikeLike
I don’t know how I kept missing the dimensions on the side there! Thank you!
LikeLiked by 1 person
No problem at all!
LikeLike
Hi! I know this was posted 2 years ago, but I really like it, and I’d like to know if I could make it in a girls size. Thanks and beautiful dress!
LikeLiked by 1 person
I’m sure you could! I actually commented back on another persons comment about how to resize it. Let me know if that helps!
LikeLike
Lovely dress! Unfortunately I’m a bit bigger in size (size 10-12), about the same shape though. Any idea how I would size up this pattern? Thank you
LikeLike
Hi Ziggy! My recommendation is as follows:
1. Take a measurement around your waist. Your waist measurement should be divided up among measurements 2 and 9. For me, I was at about a 30″ waist so I had #2 as 5″ and #9 as 6″, leaving a couple of inches for to make the seams.
2. Measure from arm pit to arm pit on the front of your body. This will be the measurement for #8.
3. Measure around your arm and divide by 2. This will be the measurement for #7.
4. Scale up #5 and #11 so that #5 is about 3x #2 and #11 is about 2x #9.
The other measurements should be the same I think! You may also want to add a little length overall. Let me know if you have any other questions!
LikeLike
I’m really confused. Initially I figured that you must have bought super stretchy fabric in order to make such a great fitting princess line dress from identical front and back pattern pieces. However, if I am reading the cutting layout correctly – the selvedge edges are on the left of the diagram – then you can cut the dress so that the stretch is from top to bottom and not side to side. Or did you manage to find a cotton fabric that stretches in both directions? If so you might want to mention that because if someone chooses a fabric that doesn’t stretch side to side they are going to be very disappointed with the fit.
LikeLiked by 1 person
Pam, thank you so much for commenting about this. You are right! This fabric is incredibly stretchy in two directions so I was able to get good stretch vertically and horizontally. I will make sure to update this post to note that. Thanks again for helping me improve my posts!
LikeLike
Whoops in rereading my comment I see where it could be confusing. I should have typed …
“… if I am reading the cutting layout correctly … you cut the dress so that the stretch is from the top of the dress to bottom of the dress and not from side to side. .Or did you manage to find a cotton fabric that stretches in both directions? If so you might want to mention that because if someone chooses a fabric that only stretches from selvedge to selvedge (and not up and down) they are going to be very disappointed with the fit.”
But I have also figured out that there is a very easy fix. Since your longest pattern piece is 36 inches long then there shouldn’t be any problem fitting all of the pieces on a two yard piece of fabric such that the long pieces are parallel to the selvedge. (And therefore the stretch will be from side to side.) In fact if you diagram the cutting layout that way you could advise people to buy a piece of fabric that is a smidgen (shoulder seam and hem) longer than twice the desired length of the finished dress.
LikeLiked by 1 person
Thanks so much for the tip! You are totally right. I will mention that as well.
LikeLike
Did I miss what size this makes? So cute on you!!
LikeLiked by 1 person
Thank you so much! I am between a size 4-6 and 5’9″ so it should be long enough for most people!
LikeLike
thats a very nice cute dress. planning to make one for my doter… she loves purple…thanks for posting such a nice t
LikeLiked by 1 person
I’m so glad you like it! It is also very comfortable and great for multiple occasions. I have been able to dress it up for down depending on the event.
LikeLike
Oh my gosh I think this might be my first sewing machine project! I LOVE it!!!! And you look amazing, the fabric is perfect!
LikeLiked by 1 person
Thanks so much Shauna! I loved the fabric too, it really inspired me!
LikeLiked by 1 person
Maybe you should just sell them to all of us so we don’t have to be disappointed by what we would end up with! 🙂
LikeLiked by 1 person
Hahaha that’s the dream! Unfortunately I don’t think I’d make the rent with my slowness … Maybe one day! 😉
LikeLiked by 1 person
What a cute dress! Beautiful on you too.
LikeLiked by 1 person
Thank you! 🙂
LikeLike