
As promised from my Instagram (@bunnybaubles), I’m giving you another dress tutorial! I hadn’t been doing much fashion sewing lately since my home decor and baked goods were keeping me occupied, but I caught the sewing bug again and got to designing this last week! This tutorial is great because it only requires four pieces to be sewn together, and you can also shorten this pattern into a shirt if you’d like.
I’d been looking for a flirty, off the shoulder dress for a while after seeing so many cute versions in other blogger’s posts, but every time I tried one on it would have a strange fit around the arms. I decided it couldn’t be too hard to figure out so I set out to making one. After a few mishaps, and much seam ripping, I have the technique perfected for my readers!


The key is to make sure to take all of your measurements according to the chart below (maybe I’ll do another post showing me taking my own measurements later to help with this…), and then carefully measure out the fabric and spend time evenly cutting everything out. The sewing portion is pretty straightforward, requiring only 6 main seams and some hemming! I hope my instructions suffice for your very own off the shoulder dress! Let me know if there are any pointers you’d like added!


DIY Off the Shoulder Dress Tutorial
Supplies:
2 yards of Stretch Fabric
Thread to match fabric
Measuring Tape
Pins
Scissors
Sewing Machine
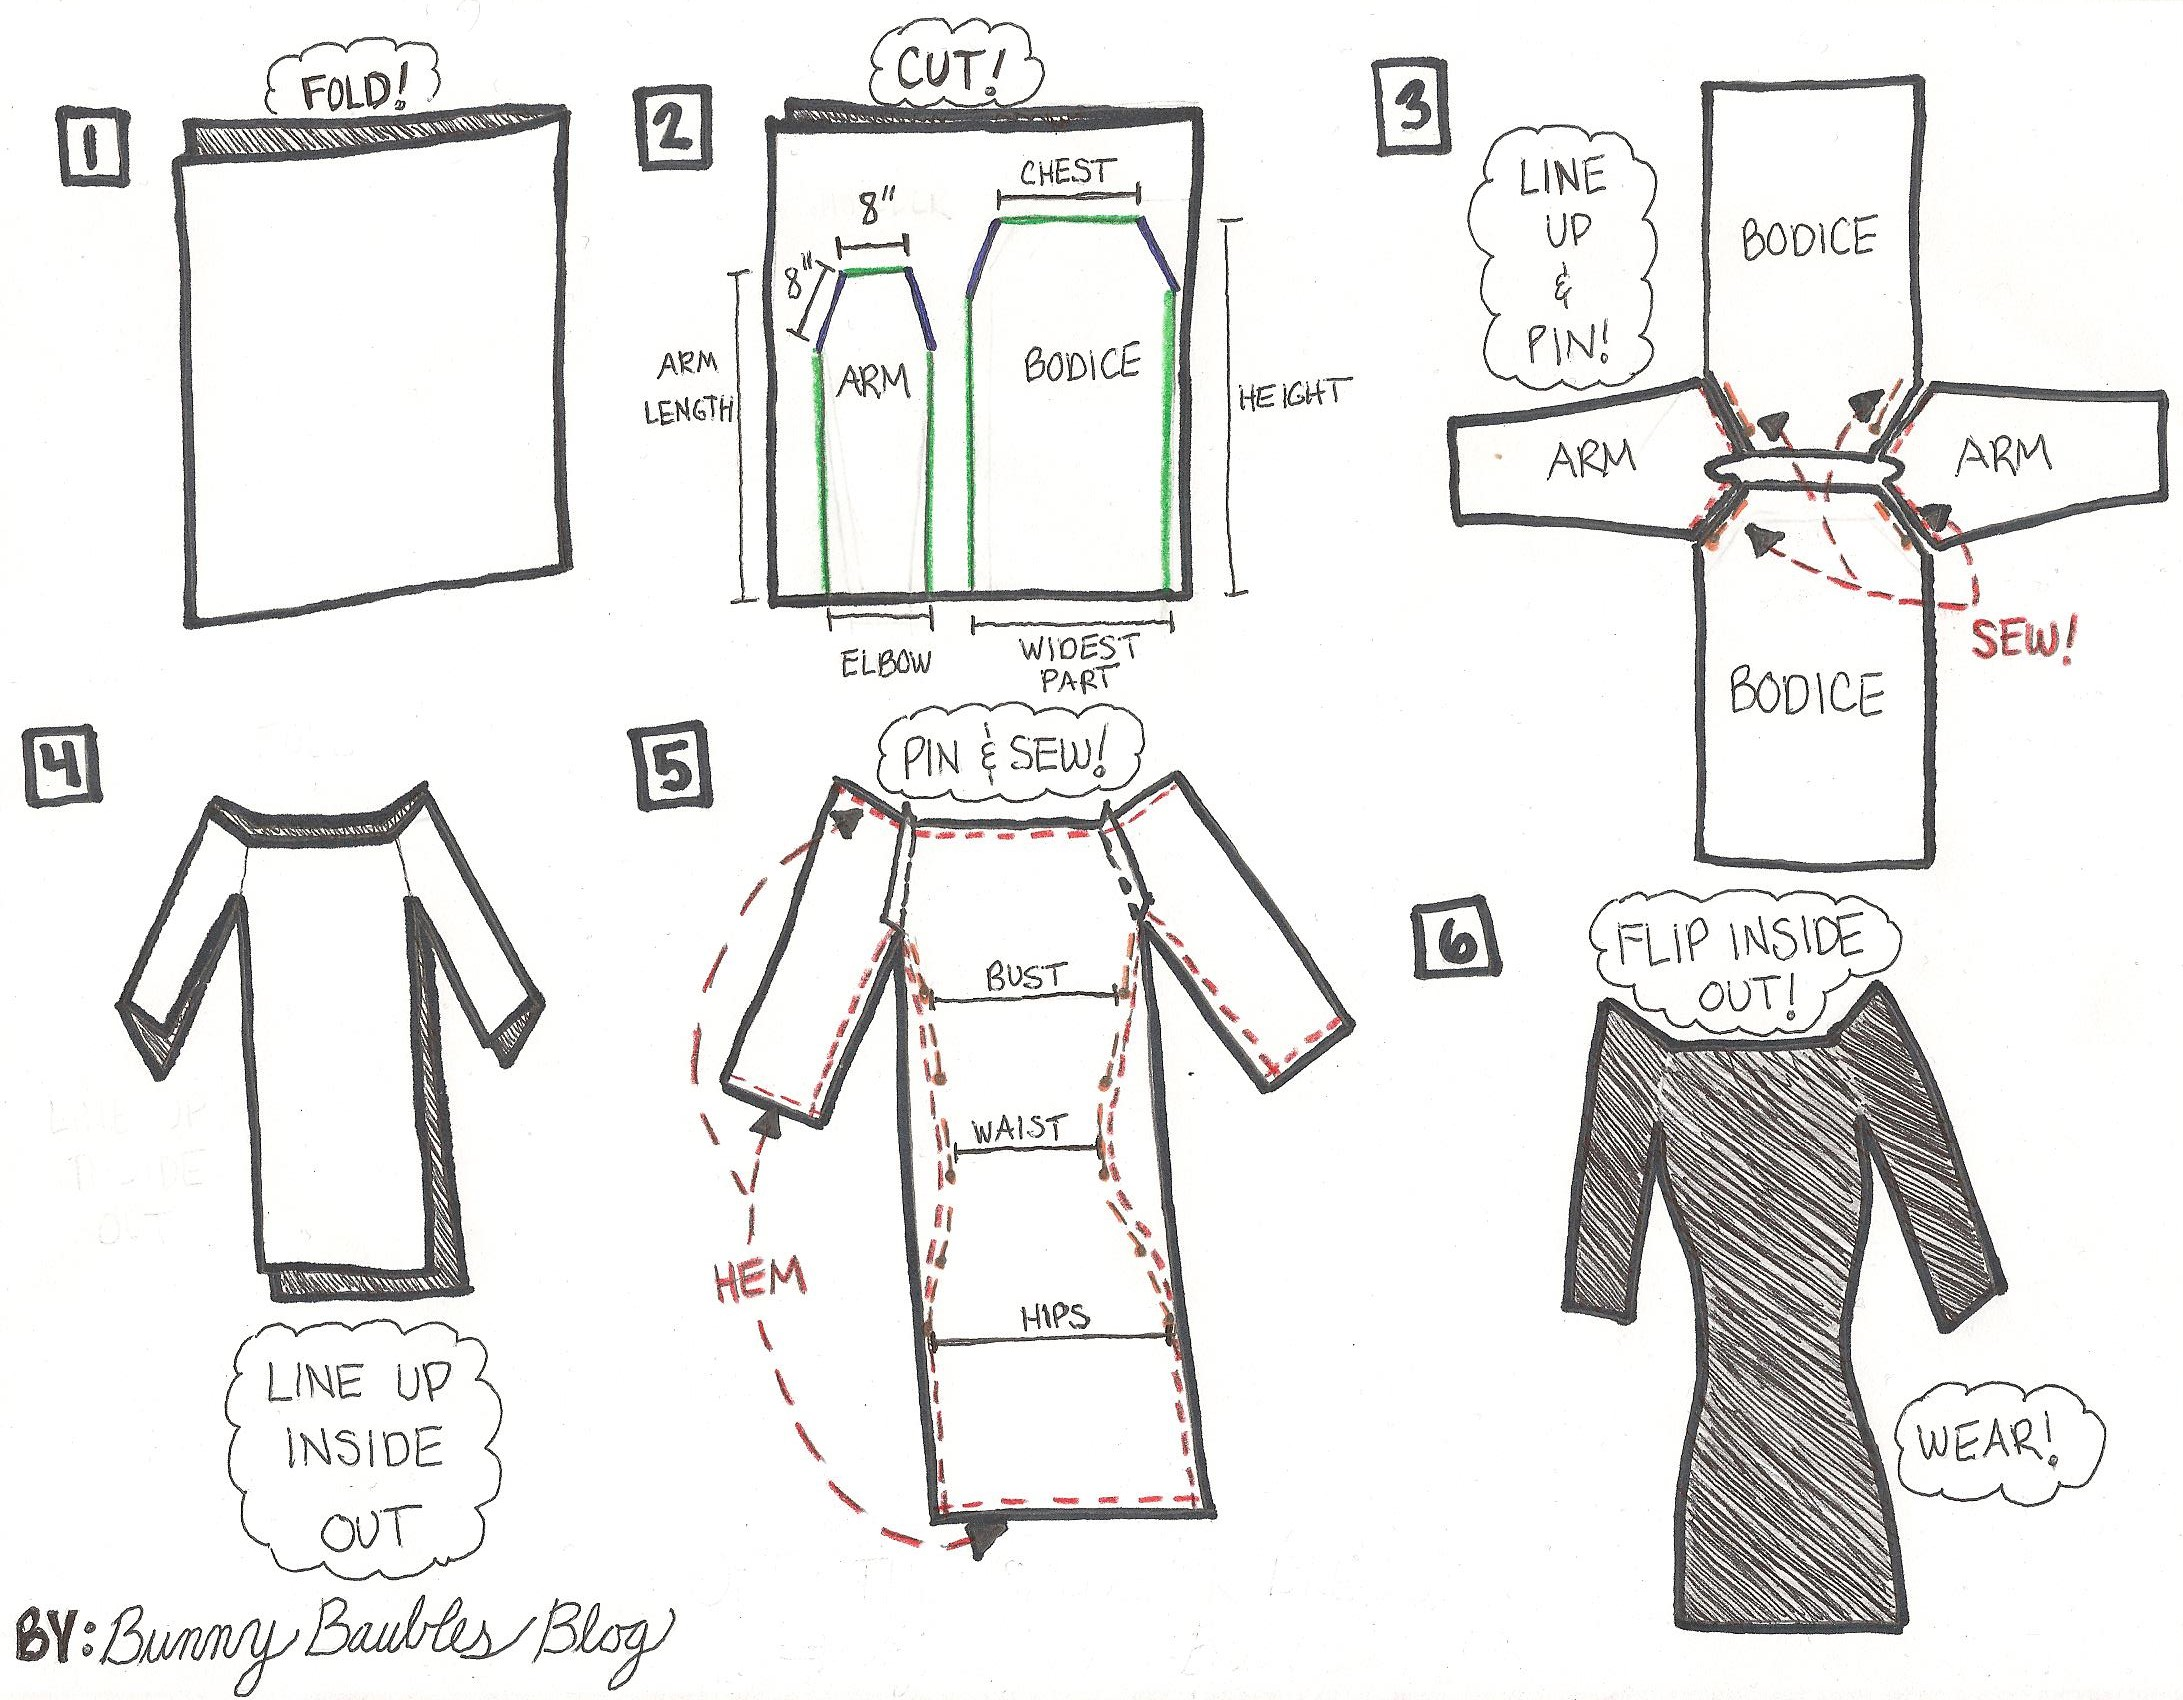
1. Wash and dry your fabric. Then, take your measuring tape and measure out all parts of your body as shown below. This step is important because it will make sewing and fitting MUCH easier! With your measurements taken, take your 2 yards of fabric and fold it in half so that it is down to 1 yard.

2. Next, you will use the chest measurement, length measurement, and the widest measurement out of your bust, waist, or hips (mine was hips) to measure out the pieces to make the body of the dress. You will use the shoulder, wrist, and arm length measurements to make the arms of the dress. Follow the diagram above to mark out the fabric pieces for the dress! NOTE: The blue angled lines are all the same length.
3. With your pieces marked, cut them out carefully with your scissors. You’re ready to sew! The first seams will be to connect the arm pieces to the body pieces. With your fabric inside out, line up the angled sides of the arm pieces with the angled sides of the body pieces (see blue lines in the diagram). Pin the fabric as shown. Sew the 4 seams at 1/4″ from the edge of the fabric.
4. With your arms sewn to the body pieces, line up the dress on a table to match both sides of the dress together inside out. You will see that the arms come together by folding the fabric in half, with the not connected part of the fabric on the underside of the arm.
5. Now is the time you can use the other 2 measurements out of the bust, waist, and hips that were smaller than the largest one (bust and waist for me) to mark out the curves of your body on the dress so you can sew around them. Measure down from the armpits of the dress to the bust line and measure out the width to match yours and mark with pins. Then do the same for the waist and hips. Pin between these three measurements along the sides of the dress so that there is a flowing seam line between them. NOTE: The skirt section of the dress should have a straight stitch down from the hip measurement.
To pin the arms, pin the 2 edges of the fabric in the area on the underside of the arm together about a 1/4″ from the edge of the fabric.
Sew along the pinned lines you just created starting at the end of the skirt, keeping the same seam as you transition from the body to the arms. You may need to stop sewing to turn the fabric so that there is a sharp corner at the armpit. Once you are done, you have the basis of the dress complete!
6. The last step is to hem the neck, arms, and skirt to the desired lengths. I turned my neck down about an inch to get a full off the shoulder look. I also brought the sleeves up about 2″ to make it a 3/4 length sleeve. The skirt was hemmed about 1″.
Turn your dress inside out and flaunt it!
Clothing Details:
Dress – Made by Me! || Shoes (similar) – Nine West || Purse – Target || Jacket (similar) – Express || Earrings – Vintage Tiffany and Co. || Watch – Kate Spade New York || Lipstick – Make Up Forever in Rouge Artist Intense

Hi there!!
I love this dress a lot.
I was wondering though where in the tutorial you used the shoulder measurement? Is it the blue angled lines or the tops of the arms?
Thank you!
LikeLiked by 1 person
Hi Jessica! Great question, the shoulder measurement is actually the 8″ measurement going across the top of each arm piece shown in green. I showed my measurement and didn’t specify – thanks for asking! So glad you like the tutorial 😊
LikeLike
After you take your measurements do you just divide by half to know what width to cut? For instance if my hips are 40, Do I cut the fabric at the hips at 20″? Thanks!!!
Cat
LikeLiked by 1 person
Yes exactly! Since your fabric stretches, 1/2 your measurements is perfect for this.
LikeLike
This dress is very versatile! I love it! Also love your bright yellow satchel; the colour really pops!!
Vivienne X
LikeLiked by 1 person
Thank you so much! I wear it all the time, and the yellow purse is one of my favorites.
LikeLiked by 1 person
Beautiful dress! And although this is a “tad” stalker-y, beautiful view from the balcony (reflection from the patio door!). 🙂
LikeLiked by 1 person
Thank you! Also I had tried to get that view in the background but the lighting was weird, glad you sought in the reflection! Haha 🙂
LikeLiked by 1 person